After doing various dry runs of the different Starter Themes, I decided to go for Bones. It is not as barebones as Underscores and not as complicated as Sage. It gives me the ideal spring pad to launch my WordPress Theme development journey.
In this short article, you can personalise “your” Bones theme in 5 easy steps.
Step #1 Rename Bones Theme Folder
When you download Bones, the theme directory is usually in format eddiemachado-bones-xxxxxxxx. Even before your install your theme in WordPress, the very first thing you will need to do is give your theme a name.
So first unzip the downloaded bones theme. Then rename the folder to your theme name. In my case, I just called it sonysimon.
Step #2 Update Theme Details
Next step is to update the details of your theme in the style.css file. You can find this file directly inside your theme folder (e.g. sonysimon/style.css).
In this file, there is already some placeholder text where you can enter all the theme details.
Click here to see an example
Click here to see an example
/******************************************************************

Theme Name: SonySimon

Theme URI: http://sonysimon.com/

Author: Sony Simon

Author URI: http://sonysimon.com/

Description: This is a personalised theme created by Sony for her personal website using Bones Starter Theme

Version: 0.1

License: GPLV2+

License URI: https://www.gnu.org/licenses/old-licenses/gpl-2.0.en.html

Tags: blog, news, custom-logo, custom-menu, grid-layout, accessibility-ready, translation-ready, microformats, post-formats

Text Domain: sonysimon

******************************************************************/
Before you make changes to style.css file, please take a copy so you don’t delete anything inadvertently.
Step #3 Replace Theme Image
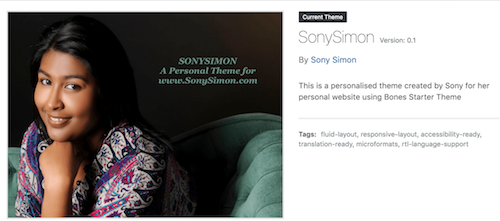
Every theme has a theme image. This is the picture you see when you view the theme details. The theme image file is screenshot.png. This file also sits directly inside the theme folder. The preferred dimension for the theme image is 1200 x 900.
Click here to see an example theme page
Click here to see an example theme page

Step #4 Replace Icon Files
There are four types of icon files – Favicons, Apple Touch Icons, Android Touch Icons and Windows Tile Icons.
Favicons are small 16×16 icon files that are displayed next to the URL of your site in a browser’s address bar. Additionally they’re often displayed next to the name of your site in a user’s list of open tabs and bookmark listings making it easier for the user to quickly identify amongst other sites.
Apple Touch icons, Android Touch icons and Windows Tile icons are used by iOS, Android and Windows devices respectively for bookmarks and web sites “added to home screen”.
Once you have decided on a square image (preferably 192px x 192 px), you can use a free favicon generator website for generating all your icon files. I recommend Favicon Generator by Dan.
Using this website you can download a zipped file will all your icons and related files. Unzip this file. Next extract all the files and place them in Theme folder > library > images folder. Next, open Theme folder > header.php. Finally, replace lines 21 to 30 of header.php file with the following code:
Click to view code
Click to view code
<?php // Icons and Favicons ?>

<link rel="apple-touch-icon" sizes="57x57" href="<?php echo get_template_directory_uri(); ?>/library/images/apple-icon-57x57.png">

<link rel="apple-touch-icon" sizes="60x60" href="<?php echo get_template_directory_uri(); ?>/library/images/apple-icon-60x60.png">

<link rel="apple-touch-icon" sizes="72x72" href="<?php echo get_template_directory_uri(); ?>/library/images/apple-icon-72x72.png">

<link rel="apple-touch-icon" sizes="76x76" href="<?php echo get_template_directory_uri(); ?>/library/images/apple-icon-76x76.png">

<link rel="apple-touch-icon" sizes="114x114" href="<?php echo get_template_directory_uri(); ?>/library/images/apple-icon-114x114.png">

<link rel="apple-touch-icon" sizes="120x120" href="<?php echo get_template_directory_uri(); ?>/library/images/apple-icon-120x120.png">

<link rel="apple-touch-icon" sizes="144x144" href="<?php echo get_template_directory_uri(); ?>/library/images/apple-icon-144x144.png">

<link rel="apple-touch-icon" sizes="152x152" href="<?php echo get_template_directory_uri(); ?>/library/images/apple-icon-152x152.png">

<link rel="apple-touch-icon" sizes="180x180" href="<?php echo get_template_directory_uri(); ?>/library/images/apple-icon-180x180.png">

<link rel="icon" type="image/png" sizes="192x192"  href="<?php echo get_template_directory_uri(); ?>/library/images/android-icon-192x192.png">

<link rel="icon" type="image/png" sizes="32x32" href="<?php echo get_template_directory_uri(); ?>/library/images/favicon-32x32.png">

<link rel="icon" type="image/png" sizes="96x96" href="<?php echo get_template_directory_uri(); ?>/library/images/favicon-96x96.png">

<link rel="icon" type="image/png" sizes="16x16" href="<?php echo get_template_directory_uri(); ?>/library/images/favicon-16x16.png">

<link rel="manifest" href="<?php echo get_template_directory_uri(); ?>/library/images/manifest.json">

<meta name="msapplication-TileColor" content="#ffffff">

<meta name="msapplication-TileImage" content="<?php echo get_template_directory_uri(); ?>/library/images/ms-icon-144x144.png">

<meta name="theme-color" content="#ffffff">
Before you make changes to header.php file, please take a copy so you don’t delete anything inadvertently.
Step #5 Install WP-SCSS
Bones uses SASS instead of CSS. Many upcoming developers I had spoken to told me about the seemingly difficult process of SASS compiling. So here is my helpful tip. Install this free plugin called WP-SCSS and you don’t have to worry about the compiling part anymore. This plugin takes care of it all.
If you found this article useful, leave me a comment below or a thumbs on social media. If you are interested in WordPress development, feel free to read my other articles about setting up a local WordPress development website and creating a WordPress plugin.
 Sony Simon Live. Love. Learn.
